I am so excited to be linking up with Tara at 4th Grade Frolics for her awesome Monday Made It series!
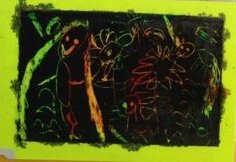
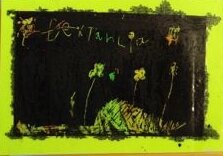
I am sharing something that my students and I made together, as the Australian schools are still in session. We have pen pals from Argentina, and we wanted to send them something special.
We decided to make our own scratchboard, and then use it to make some beautiful artwork! To make the scratchboard you need some card stock or thicker drawing paper. We used colored card stock which gave it a neon effect when we finished, but you could use white card if you prefer. You also need some paper to tape it to. It could be newspaper or other scrap paper. Finally, you need some tape (masking tape or painter’s tape is probably the best bet.) Tape a card stock rectangle, or whatever shape you prefer, into the middle of the scrap paper. You want to tape the edges down evenly. In this way the tape will cover an edge that will remain the original color. Then use crayons to color over all of the remaining card stock. You will want to use a variety of colors, the brighter the better. You can scribble, colors in stripes or chunks, or whatever moves you. My students LOVED this part! The harder the pressure you use the better.

The next step is to create the black coating for the scratchboard. You need to mix black paint (I used regular tempera) and laundry soap (I got a cheap, generic brand). You need to use one part paint to one part laundry soap. Then mix it up!

Use a roller, paintbrush, or sponge to cover the colored card stock with paint. You will need to do several coats. The paint mixture will be a bit bubbly, but don’t worry. After a few coats, leave it to dry. We left ours overnight. Once the paint is completely dry, remove the tape from the card, which will reveal the edges – a beautiful picture frame!

The last step is to create a picture or design. You can use any sort of tool you like to scrape the black off of the board, which will reveal the colors behind it. We used paper clips, but you can use a fork, coin, or even a fingernail!

My students created lots of different designs. Some loved scraping and made designs, while others concentrated on drawing specific pictures. Just be sure not to scrape ALL of the black off, as that would defeat the purpose.
It’s as simple as that! Have fun making, and be sure to check out the other amazing ideas on Tara’s link up!
How FUN! I bet the kids absolutely love this as much as the kids do that are receiving them. I need to try this out. I have seen people use them with rewards underneath, but I had never thought about displaying artwork under there!
Alison
Rockin’ and Lovin’ Learnin’
It was great fun, and my kids were SO FOCUSED! We loved it.
AWESOME. I’m going to have to try this. Looks like a cute craft I could use with my summer reading program.
Thanks! Let me know how it goes!
I love teachers that let kids paint! I was never one of those- until I started being the STEM Lab teacher. Now we get messy! Your art work turned out great!
Carol
Thank you! Mess is all part of the fun, isn’t it?